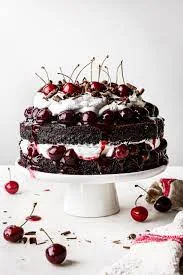
When it comes to iconic desserts, few can rival the classic Black Forest cake. This German masterpiece, known as "Schwartzwalder Kirsch torte" in its native tongue, is a luscious combination of chocolate, cherries, and whipped cream, creating a symphony of flavors and textures that delights the senses. If you're a fan of decadent desserts, learning how to make the best Black Forest cake is a must. Here's a step-by-step guide to creating a show-stopping Black Forest cake that will impress your friends and family.
The History Behind Black Forest Cake
Before diving into the recipe, it’s worth taking a moment to appreciate the origins of this beloved cake. The Black Forest region in Germany is known for its sour cherries and kirsch (a clear cherry brandy), which are the essential ingredients in a traditional Black Forest cake. The dessert itself became popular in the early 20th century, and its exact origin is somewhat disputed. However, the cake's name is thought to be inspired by the Black Forest (Schwarz Wald) region's dark, mysterious woods, which is reflected in the deep chocolate flavor of the cake.
Ingredients You'll Need
To make the best Black Forest cake, you'll need the following ingredients:
For the Chocolate Cake Layers:
1 ¾ cups (220g) all-purpose flour
2 cups (400g) granulated sugar
¾ cup (75g) unsweetened cocoa powder
1 ½ teaspoons baking powder
1 ½ teaspoons baking soda
1 teaspoon salt
2 large eggs
1 cup (240ml) whole milk
½ cup (120ml) vegetable oil
2 teaspoons vanilla extract
1 cup (240ml) boiling water
For the Cherry Filling:
1 ½ cups (350g) pitted sour cherries (fresh or canned)
½ cup (100g) granulated sugar
2 tablespoons cornstarch
1 tablespoon lemon juice
¼ cup (60ml) kirsch (optional)
For the Whipped Cream Frosting:
3 cups (720ml) heavy cream, chilled
½ cup (60g) powdered sugar
1 teaspoon vanilla extract
For Decoration:
Chocolate shavings or curls
Fresh cherries
Step-by-Step Instructions
1. Prepare the Chocolate Cake Layers
Start by preheating your oven to 350°F (175°C). Grease and flour three 8-inch round cake pans, or line them with parchment paper for easy removal.
In a large mixing bowl, sift together the flour, sugar, cocoa powder, baking powder, baking soda, and salt. This ensures that your cake will have a fine texture without lumps.
In a separate bowl, whisk together the eggs, milk, vegetable oil, and vanilla extract. Gradually add the wet ingredients to the dry ingredients, mixing until just combined. The batter will be thick at this stage.
Carefully stir in the boiling water. The batter will become thin, but don't worry—this is what gives the cake its moist, tender crumb.
Divide the batter evenly between the prepared cake pans. Bake for 30 to 35 minutes, or until a toothpick inserted into the center of the cakes comes out clean. Let the cakes cool in the pans for about 10 minutes, then transfer them to a wire rack to cool completely.
2. Make the Cherry Filling
While the cakes are cooling, it’s time to prepare the cherry filling. If you're using fresh cherries, pit them and cut them in half. If you're using canned cherries, drain them well.
In a medium saucepan, combine the cherries, sugar, cornstarch, and lemon juice. Cook over medium heat, stirring frequently, until the mixture thickens and the cherries have softened. This should take about 5 to 7 minutes. If you want to make your Black Forest cake extra special, stir in the kirsch at this point. It adds a subtle cherry flavor and a hint of warmth from the alcohol.
Remove the cherry filling from the heat and let it cool completely before using it in the cake.
3. Whip the Cream
Next, whip the heavy cream in a large mixing bowl until it begins to thicken. Gradually add the powdered sugar and vanilla extract, continuing to beat the cream until soft peaks form. Be careful not to overwhip, as you want the cream to be light and fluffy, not grainy.
4. Assemble the Cake
Once the cake layers have cooled completely, it’s time to assemble the Black Forest cake.
Start by placing one cake layer on a serving plate or cake stand. Spread a generous layer of the cherry filling over the top, making sure to spread it out to the edges.
Add a layer of whipped cream on top of the cherries, spreading it evenly. Place the second cake layer on top and repeat the process with the cherry filling and whipped cream. Finally, add the third cake layer on top.
Frost the top and sides of the cake with the remaining whipped cream. To achieve a smooth finish, use a cake scraper or an offset spatula.
5. Decorate the Cake
Now comes the fun part—decorating the cake! Sprinkle chocolate shavings or curls over the top of the cake, and if you’re feeling extra indulgent, cover the sides as well.
Finish by placing a few fresh cherries on top for a classic look. If you want to add a touch of elegance, you can pipe small rosettes of whipped cream around the edges and top them with cherries.
Tips for Success
Use high-quality ingredients: The best Black Forest cake starts with the best ingredients. Use real butter, high-quality cocoa powder, and fresh cherries if possible. The kirsch, while optional, adds an authentic flavor that's hard to beat.
Cool completely before assembly: Make sure your cake layers and cherry filling are completely cool before assembling the cake. If the cake is warm, the whipped cream can melt, resulting in a messy dessert.
Stabilize the whipped cream: If you’re worried about your whipped cream losing its shape, you can stabilize it by adding a teaspoon of gelatin dissolved in a tablespoon of warm water to the cream before whipping. This will help the whipped cream hold up better, especially in warm conditions.
Let it rest: After assembling the cake, let it rest in the refrigerator for a few hours or overnight. This allows the flavors to meld together and makes slicing the cake easier.
Conclusion
The best Black Forest cake is all about balance—rich chocolate cake, tart cherries, and fluffy whipped cream all coming together to create a dessert that's both indulgent and refreshing. Whether you’re making it for a special occasion or just because, this recipe is sure to impress. Follow these steps, and you’ll be well on your way to creating a Black Forest cake that’s as beautiful as it is delicious. Enjoy!


Social Plugin