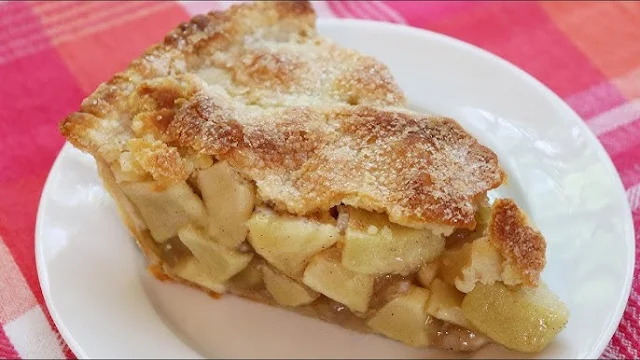
Apple pie is a timeless classic, and while the filling gets most of the attention, the crust is equally important. A homemade pie crust can make all the difference between an average pie and an exceptional one. Many bakers opt for store-bought crusts for convenience, but if you want to elevate your pie game, mastering the art of making a homemade crust is essential. In this blog, we will break down the recipe for creating the perfect apple pie crust from scratch, including tips and tricks to ensure it's flaky, buttery, and delicious.
Why Make a Homemade Pie Crust?
Before we dive into the recipe, let’s first address why making a homemade pie crust is worth the effort.
Flavor: Store-bought pie crusts often lack the rich, buttery taste that homemade crusts provide. The ingredients in store-bought crusts can include preservatives and artificial flavors, which can dull the overall taste of your pie.
Texture: A homemade crust has a texture that’s hard to beat. When done right, it will be buttery, flaky, and melt-in-your-mouth delicious. Store-bought options often end up either too doughy or too dry.
Customization: When making your own pie crust, you have complete control over the ingredients. This means you can adjust for personal preferences, dietary restrictions, or even add a twist by incorporating different types of flour or seasoning.
Now that we’ve covered why you should make your own pie crust, let’s dive into the step-by-step guide on how to create the perfect homemade apple pie crust.
Ingredients for a Homemade Apple Pie Crust
To make the perfect pie crust for your apple pie, you'll need a few basic ingredients:
2 ½ cups all-purpose flour: All-purpose flour works best for creating a balanced, tender crust. You can substitute part of it with whole wheat or pastry flour if desired, but for the flakiest results, stick with all-purpose.
1 cup unsalted butter (cold and cut into cubes): Butter is key to a flavorful, flaky crust. Make sure it’s cold to prevent it from melting into the flour during the mixing process, which can lead to a dense crust.
1 teaspoon salt: This helps to balance out the flavors. Don’t skip the salt, as it enhances the buttery richness of the crust.
1 tablespoon granulated sugar: Sugar adds a touch of sweetness to the dough, which pairs well with the tartness of the apple filling.
6-8 tablespoons ice water: Ice water ensures the dough stays cold as you bring it together. The amount of water you need may vary slightly based on your flour and climate.
Optional: 1 tablespoon apple cider vinegar: Some bakers like to add a splash of apple cider vinegar to help tenderize the dough and prevent gluten formation, which can lead to a tough crust.
Step-by-Step Instructions for Making the Crust
1. Prepare Your Ingredients
Before you start, make sure your butter is cold. One way to ensure this is to cut it into small cubes and then place it back in the refrigerator or freezer for about 15 minutes. Cold butter is essential for achieving that perfect flaky texture. If the butter melts into the flour, it won’t create those desired layers.
Additionally, prepare your ice water by filling a cup with cold water and adding a few ice cubes. This will keep the water at the right temperature while you work on the dough.
2. Mix the Dry Ingredients
In a large mixing bowl, whisk together the flour, sugar, and salt. This ensures that the dry ingredients are evenly distributed before adding the butter.
3. Cut in the Butter
Next, it’s time to cut the butter into the flour mixture. There are a couple of ways to do this. You can use a pastry cutter, a fork, or your hands. Another effective method is using a food processor, pulsing until the mixture resembles coarse crumbs. The butter pieces should range in size from small peas to larger, marble-sized chunks. These butter pockets are what create flakiness in the crust, so be sure not to overwork the dough.
4. Add the Ice Water
Gradually add the ice water to the flour-butter mixture. Start with about 6 tablespoons, mixing gently with a fork or your hands. The goal is to add just enough water for the dough to come together without becoming too wet. You should be able to pinch the dough between your fingers, and it should hold its shape.
If you’re finding the dough too dry, add more ice water one tablespoon at a time until it reaches the right consistency. Remember, it’s better for the dough to be slightly shaggy than too wet.
5. Form the Dough
Once the dough has come together, turn it out onto a lightly floured surface. Gently shape it into two equal disks (one for the top crust and one for the bottom). Be careful not to knead or overwork the dough, as this can lead to a tough crust. The less you handle it, the flakier it will be.
Wrap each disk in plastic wrap and refrigerate for at least 30 minutes before rolling it out. This resting period allows the butter to firm up again, helping to create those distinct layers when baked.
Rolling Out the Pie Dough
1. Prepare Your Surface and Rolling Pin
Lightly flour your work surface and rolling pin to prevent sticking. Take one of the dough disks out of the refrigerator and let it sit for a few minutes to soften slightly, making it easier to roll out.
2. Roll Out the Dough
Starting from the center of the disk, roll the dough outward in all directions. Be gentle but firm, applying even pressure to ensure an even thickness. The dough should be rolled out to about 1/8-inch thickness and should be about 12 inches in diameter for a standard 9-inch pie pan.
3. Transfer to Pie Pan
Carefully roll the dough onto your rolling pin, then unroll it into your pie dish. Gently press the dough into the bottom and sides of the pan, making sure not to stretch it, as this can cause the dough to shrink during baking.
Making the Top Crust
Once you’ve filled your pie with the apple filling, you’ll need to roll out the second disk of dough for the top crust. You can either place it as a solid sheet over the filling or get creative with a lattice design.
For a solid crust: Roll out the second disk of dough just as you did the bottom. Place it over the filling, trim any excess, and crimp the edges to seal. Be sure to cut a few small slits in the top to allow steam to escape while baking.
For a lattice crust: Roll out the dough and cut it into 1-inch strips. Weave the strips over the filling in a crisscross pattern to create a lattice design.
Baking the Pie
Preheat your oven to 425°F (220°C). Brush the top crust with an egg wash (one egg beaten with a tablespoon of water) to give it a golden, shiny finish. If desired, you can also sprinkle some sugar on top for added sweetness and texture.
Bake the pie for 45-50 minutes or until the crust is golden brown and the filling is bubbling through the slits or lattice. If the edges of the crust start to brown too quickly, cover them with foil or a pie shield to prevent burning.
Conclusion
Mastering a homemade apple pie crust may seem intimidating, but with a little practice, it’s easy to perfect. By using simple ingredients like flour, butter, and ice water, and following these step-by-step instructions, you’ll achieve a flaky, buttery crust that elevates your apple pie to the next level. So next time you’re baking a pie, skip the store-bought crust and try making your own—you won’t regret it!


Social Plugin